  /etc/thruk                       Thruks config
  /etc/httpd/conf.d/thruk.conf     Apache config
  /usr/share/thruk                 shared files
  /usr/lib/thruk/perl5             Perl libraries
  /var/cache/thruk                 temporary files
  /var/lib/thruk                   stored user settings
Installation
There are several ways of installing Thruk.
Labs Consol Repository
The Labs Repository provides packages of latest Thruk releases (including daily development builds) and other Tools like Mod-Gearman. Just follow the guide on the labs page for your distribution.
OMD
An easy way of installing Thruk is using OMD from omdistro.org. There are Debian, Ubuntu, Centos and Suse Packages containing preconfigured latest versions of Nagios and Thruk. The package also includes Icinga, Shinken, pnp4nagios, check_mk and Nagvis. OMD is the recommended way of installing new Nagios / Thruk setups when you want to install several addons at once.
Use Packages
Standalone installation from a binary package is another easy way to get Thruk running.
Download packages from the download page.
All packages have the following filesystem structure:
After installation, Thruk is available at http://your-host/thruk/ and has a default user 'thrukadmin' with password 'thrukadmin' configured. You may need to change backend configuration. This should be done in the thruk_local.conf where all settings can be overridden.
Debian / Ubuntu
#> dpkg -i thruk_1.84_debian6_amd64.deb
In case of dependency errors, run 'apt-get -f install' and try the 'dpkg -i…' again.
Centos / Redhat
#> yum install --nogpgcheck thruk-1.84-1.rhel6.x86_64.rpm
You may need to include an external repository for mod_fastcgi module. Epel or Rpmforge should do it.
SLES
#> zypper install thruk-1.84-1.sles11.x86_64.rpm
You may need the SLES sdk dvd for additional dependencies.
Source Installation
A Source Installation can sometimes be usefull if you have special requirements to paths and users. This is only for experienced users and should be considered as last resort.
There is a separate page with detailed Instructions.
Configuration
The thruk.conf will be overwritten with new defaults on updates. The
thruk_local.conf contains the local overrides and will never be
overwritten.
    /etc/thruk/thruk_local.conf
    /etc/thruk/cgi.cfg
See the Thruk Configuration section for detailed explaination of options from the thruk_local.conf.
See the CGI Configuration section for options from the cgi.cfg file.
Apache Configuration
|
apache is preconfigured when using packages
Apache configuration is not needed if you use OMD or packages. Apache is already preconfigured in that case. |
Apache configuration is covered in the Webserver Integration section.
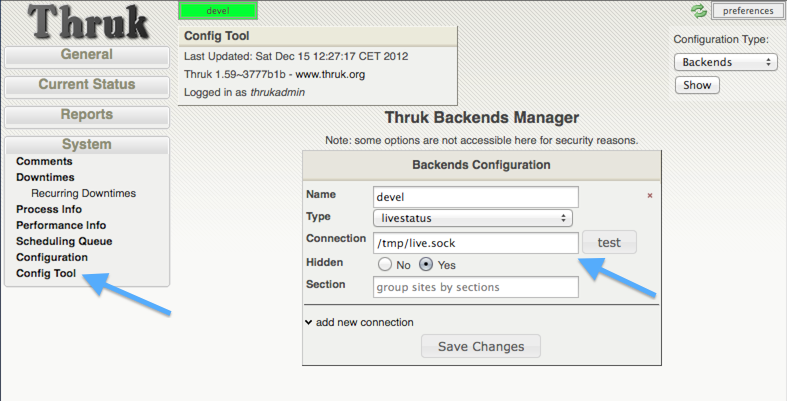
Backend Configuration
You may connect multiple backends into one Thruk interface. Just specify multiple 'peer' items.
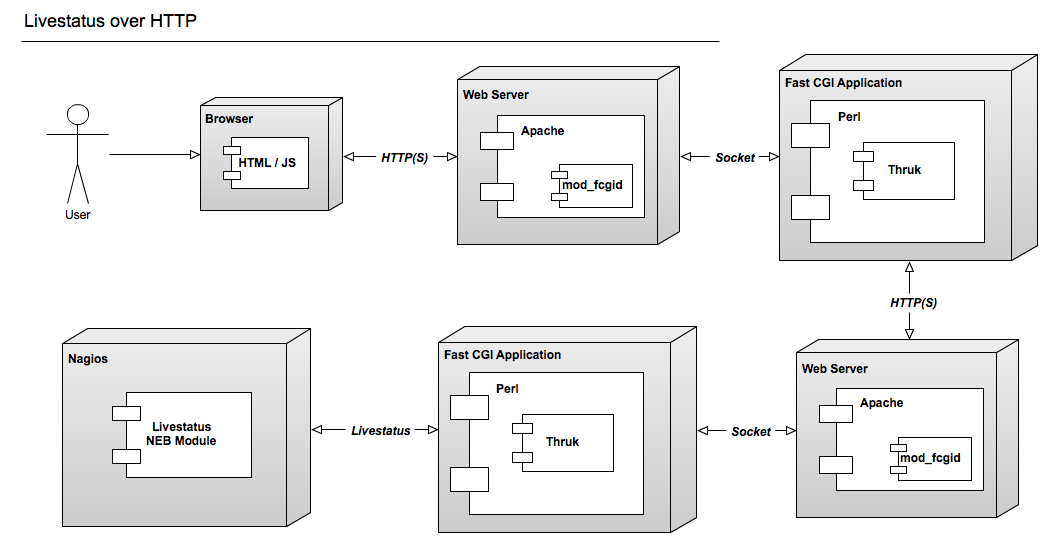
Livestatus
Livestatus is a addon for Naemon, Nagios or Icinga which provides real time status data. Contrary to database addons it adds very little overhead to the Naemon core which makes livestatus based gui fast and real time.
|
Shinken
Shinken has livestatus support built-in and does not require additional modules. |
Refer to https://checkmk.com/cms_livestatus.html on how to install livestatus onto your monitoring box. The Lab Consol Repository has livestatus rpm packages. For debian based Linux systems just use the provided packages of your distribution.
Basically you have to build the NEB module and add it to your naemon.cfg, nagios.cfg or icinga.cfg.
broker_module=/opt/local/livestatus/livestatus.o /tmp/live.sock
Then use the socket as 'peer' parameter in your backend configuration.
Thruk Backends
Livestatus Architecture

thruk_local.conf:
  <Component Thruk::Backend>
      <peer>
          name    = local livestatus
          type    = livestatus
          <options>
              peer    = /var/run/live
          </options>
      </peer>
  </Component>
TLS Livestatus
new in release v2.20TLS Livestatus is just like livestatus but encrypted with TLS/SSL. Therefor you need to create certificates and configure your backend(s) for example like:
thruk_local.conf:
  <Component Thruk::Backend>
      <peer>
          name    = remote_site
          type    = livestatus
          <options>
              peer    = tls://remote_host:6557
              cert    = /etc/thruk/client.pem
              key     = /etc/thruk/client.key
              ca_file = /etc/thruk/server.crt
              verify  = 1
          </options>
      </peer>
  </Component>
Adding cert and key is optional and enables client certificate authorization.
The ca_file is used to verify the certificate of the server. Hostname and
certificate verification can be disabled by setting verify to 0. But it’s
not recommended and makes your connection as secure as without tls.
A full configuration example is here assuming an omd installation with a site named demo:
Fetch makecert.sh from https://github.com/sni/thruk/blob/master/support/makecert.sh
%> ./makecert.sh remote_host your@email.com
xinetd.conf:
  service tls_livestatus
  {
          type            = UNLISTED
          socket_type     = stream
          protocol        = tcp
          port            = 6557
          wait            = no
          cps             = 100 3
          instances       = 500
          per_source      = 250
          flags           = NODELAY
          disable         = no
          user            = demo
          server          = /usr/bin/stunnel
          server_args     = /omd/sites/demo/etc/stunnel/stunnel.conf
  }
stunnel.conf:
  service                = tls_livestatus
  exec                   = /usr/bin/timeout
  execargs               = timeout 600 /omd/versions/default/bin/unixcat /omd/sites/demo/tmp/run/live
  cert                   = /omd/sites/demo/etc/stunnel/server.pem
  key                    = /omd/sites/demo/etc/stunnel/server.key
  compression            = zlib
  ciphers                = AES128-SHA
  verify                 = 2
  CAfile                 = /omd/sites/demo/etc/stunnel/client.pem
  TIMEOUTidle            = 600
  debug                  = debug
  output                 = /omd/sites/demo/var/log/stunnel.log
  syslog                 = no
HTTP
A HTTP connection is possible between multiple Thruk installations. A HTTP connection not only makes live data available, it also offers a secure way to manage object configuration from remote. To authenticate the central Thruk installation, you need to provide the secret key from the slave instance. This setup is perfect for managing several independent installations from a central point of view.
|
use SSL
It’s strongly recommended to use HTTPS for remote connections. |
    # package installation
    %> cat /var/lib/thruk/secret.key

    # omd site
    OMD[site]:~$ cat var/thruk/secret.key
HTTP Architecture
thruk_local.conf:
  <Component Thruk::Backend>
      <peer>
          name    = remote_http
          type    = http
          <options>
              peer  = http://remote_host/thruk/
              auth  = key from remote installation var/thruk/secret.key
          </options>
      </peer>
  </Component>
MySQL
The MySQL Database is not a real backend for status data, but it can be used as a logfile cache.
ex.:
logcache = mysql://username:password@localhost:3306/thruk_logs
Details are explained in the Logfile Cache section.